Published June 19, 2018 by

Integrate OnlyOffice Document Server in NextCloud

Installing OnlyOffice Document Server for Linux on Debian, Ubuntu, and derivatives


Adding the repository containing the up-to-date Node.js package versions:

Add repository:

curl -sL https://deb.nodesource.com/setup_6.x | sudo bash -
sudo apt-get install -y nodejs

Installing and configuring PostgreSQL:

Install the PostgreSQL version included in your version of Ubuntu:

sudo apt-get install postgresql

After PostgreSQL is installed, create the PostgreSQL database and user:

sudo -i -u postgres psql -c "CREATE DATABASE onlyoffice;"
sudo -i -u postgres psql -c "CREATE USER onlyoffice WITH password 'onlyoffice';"
sudo -i -u postgres psql -c "GRANT ALL privileges ON DATABASE onlyoffice TO onlyoffice;"

Installing Redis:

sudo apt-get install redis-server

Installing rabbitmq:

sudo apt-get install rabbitmq-server

Installing Document Server

Add GPG key:

sudo apt-key adv --keyserver hkp://keyserver.ubuntu.com:80 --recv-keys CB2DE8E5

Add Document Server repository:

sudo echo "deb http://download.onlyoffice.com/repo/debian squeeze main" | sudo tee /etc/apt/sources.list.d/onlyoffice.list

Update the package manager cache:

sudo apt-get update

Install Document Server

sudo apt-get install onlyoffice-documentserver

Now go to a browser and try to access server_ip OR localhost


Document Server is running now.


Integrate OnlyOffice Editor in NextCloud

Download onlyoffice editor

cd /tmp

wget https://github.com/ONLYOFFICE/onlyoffice-owncloud/releases/download/v1.3.0/onlyoffice-nextcloud.tar.gz

tar xzf onlyoffice-nextcloud.tar.gz
cp -r onlyoffice /var/www/html/nextcloud/apps/
cd /var/www/html/nextcloud/apps/

Then run the commands below to set the correct permissions for onlyoffice to function.

sudo chown -R www-data:www-data onlyoffice

Edit config.php for onlyoffice permission.

sudo vim /var/www/html/nextcloud/config/config.php

Insert below data

'onlyoffice' => array(
'verify_peer_off' => true
)

Save and Exit.

Access Nextcloud, Go to Admin icon and click on ‘+ Apps’ button.


Click on ‘Disabled apps’ and  do ‘Enable onlyoffice


Here it asks for an admin password. give a Password and Confirm.


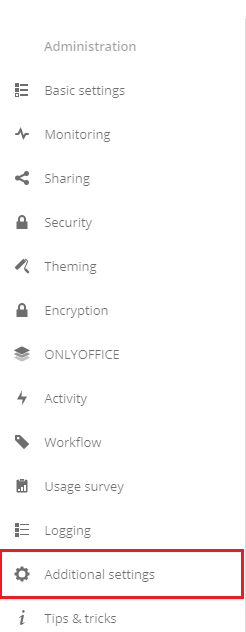
Now, Go to Settings.


Click on Additional Settings in Left Panel bottom.

Scroll down to ONLYOFFICE options and give Document Server address and click on Save as per below Screenshot.


Now it's done and let's start to create documents.
Read More
Published June 19, 2018 by

Install NextCloud On Ubuntu/Debian

This post shows you how to install NextCloud on Ubuntu 16.04 LTS with Apache2, MariaDB, and PHP. NextCloud is a fork of OwnCloud. Like DropBox and other cloud storage services, NextCloud and OwnCloud provide similar functions and unlike the others, they both are free to use.

This brief tutorial shows students and new users steps to install and configure NextCloud on Ubuntu 16.04 LTS Servers their own environment.


To get started with installing NextCloud, follow the steps below:

Step 1: Install Apache2

NextCloud requires a web server to function and the most popular web server in use today is Apache2. So, go and install Apache2 on Ubuntu by running the commands below:

sudo apt-get update
sudo apt install apache2 -y

After installing Apache2, run the commands below to disable directory listing.

sudo sed -i "s/Options Indexes FollowSymLinks/Options FollowSymLinks/" /etc/apache2/apache2.conf

Next, run the commands below to stop, start and enable Apache2 service to always start up with the server boots.


sudo systemctl stop apache2.service
sudo systemctl start apache2.service
sudo systemctl enable apache2.service

Step 2: Install MariaDB

NextCloud also requires a database server to function.. and MariaDB database server is a great place to start. To install it run the commands below.

sudo apt-get update
sudo apt-get install mariadb-server mariadb-client -y

After installing, the commands below can be used to stop, start and enable MariaDB service to always start up when the server boots.

sudo systemctl stop mysql.service
sudo systemctl start mysql.service
sudo systemctl enable mysql.service

After that, run the commands below to secure MariaDB server.


sudo mysql_secure_installation

When prompted, answer the questions below by following the guide.

  • Enter current password for root (enter for none): Just press the Enter
  • Set root password? [Y/n]: Y
  • New password: Enter password
  • Re-enter new password: Repeat password
  • Remove anonymous users? [Y/n]: Y
  • Disallow root login remotely? [Y/n]: Y
  • Remove test database and access to it? [Y/n]:  Y
  • Reload privilege tables now? [Y/n]:  Y
Restart MariaDB server

sudo systemctl restart mysql.service

Step 3: Install PHP 7.1 And Related Modules

Run the commands below to add the below third party repository to upgrade to PHP 7.1


sudo apt-get install software-properties-common
sudo add-apt-repository ppa:ondrej/php

Then update and upgrade to PHP 7.1

sudo apt update

Run the commands below to install PHP 7.1 and related modules.

sudo apt install php7.1 libapache2-mod-php7.1 php7.1-common libapache2-mod-php7.1 php7.1-mbstring php7.1-xmlrpc php7.1-soap php7.1-apcu php7.1-smbclient php7.1-ldap php7.1-redis php7.1-gd php7.1-xml php7.1-intl php7.1-json php7.1-imagick php7.1-mysql php7.1-cli php7.1-mcrypt php7.1-ldap php7.1-zip php7.1-curl -y

After install PHP 7.1, run the commands below to open PHP-FPM default file.

sudo vim /etc/php/7.1/apache2/php.ini

Then make the change the following lines below in the file and save.

file_uploads = On
allow_url_fopen = On
memory_limit = 256M
upload_max_filesize = 64M
max_execution_time = 360
date.timezone = Asia/Kolkata


Step 4: Create NextCloud Database and Configure

Now that you’ve install all the packages that are required, continue below to start configuring the servers. First run the commands below to create NextCloud database.

Run the commands below to logon to the database server. When prompted for a password, type the root password you created above.

sudo mysql -u root -p

Then create a database nextcloud

CREATE DATABASE nextcloud;

Create a database user nextclouduser with new password

CREATE USER 'nextclouduser'@'localhost' IDENTIFIED BY 'password';

Then grant the user full access to the database.

GRANT ALL ON nextcloud.* TO 'nextclouduser'@'localhost' IDENTIFIED BY 'password' WITH GRANT OPTION;

Finally, save your changes and exit.

FLUSH PRIVILEGES; EXIT;


Step 5: Download NextCloud Latest Release

Next, visit NextCloud site to download your free copy. The community edition is what you’ll want to download.

After downloading, run the commands below to extract the download file into Apache2 root directory.

cd /tmp
wget https://download.nextcloud.com/server/releases/nextcloud-13.0.4.zip
apt-get install unzip -y
unzip nextcloud-13.0.4.zip
sudo mv nextcloud /var/www/html/nextcloud/

Then run the commands below to set the correct permissions for NextCloud to function.

sudo chown -R www-data:www-data /var/www/html/nextcloud/
sudo chmod -R 755 /var/www/html/nextcloud/


Step 6: Configure Apache2

Finally, configure Apahce2 site configuration file for NextCloud. This file will control how users access NextCloud content. Run the commands below to create a new configuration file called
nextcloud.conf

sudo vim /etc/apache2/sites-available/nextcloud.conf

Then copy and paste the content below into the file and save it. Replace the highlighted line with your own domain name and directory root location.

<VirtualHost *:80>
    ServerAdmin admin@example.com
    DocumentRoot /var/www/html/nextcloud/
    ServerName example.com
    ServerAlias www.example.com
    Alias /nextcloud "/var/www/html/nextcloud/"


    <Directory /var/www/html/nextcloud/>
            Options +FollowSymlinks
            AllowOverride All
            Require all granted
                   <IfModule mod_dav.c>
                          Dav off
                   </IfModule>
             SetEnv HOME /var/www/html/nextcloud
             SetEnv HTTP_HOME /var/www/html/nextcloud
    </Directory>


    ErrorLog ${APACHE_LOG_DIR}/error.log
    CustomLog ${APACHE_LOG_DIR}/access.log combined


</VirtualHost>

Save the file and exit.

Step 7: Enable The NextCloud And Rewrite Module

After configuring the VirtualHost above, enable it by running the commands below

sudo a2ensite nextcloud.conf
sudo a2enmod rewrite
sudo a2enmod headers sudo a2enmod env sudo a2enmod dir sudo a2enmod mime

Step 8 : Restart Apache2

To load all the settings above, restart Apache2 by running the commands below.

sudo systemctl restart apache2.service

Step 9 : Reboot Server

reboot

Step 10 : Access Nextcloud

Then open your browser and browse to the server_ip/nextcloud. You should see NextCloud setup wizard to complete. Please follow the wizard carefully.


Click Finish setup and you’re done.
Read More
Published June 13, 2018 by

AWS Computer Service - WorkSpaces

Amazon WorkSpaces is a fully managed desktop computing service in the cloud that allows its customers to provide cloud-based desktops to their end-users. Through this, the end users can access the documents, applications, and resources using devices of their choice such as laptops, iPad, Kindle Fire, or Android tablets. This service was launched to meet its customers rising demand for Cloud-based 'Desktop as a Service' (DaaS).

How it works?

Each WorkSpace is a persistent Windows Server 2008 R2 instance that looks like Windows 7, hosted on the AWS cloud. Desktops are streamed to users via PCoIP and the data backed up will be taken on every 12 hours by default.

User Requirements

An Internet connection with TCP and UDP open ports is required at the user’s end. They have to download a free Amazon WorkSpaces client application for their device.

How to Create Amazon Workspaces?

Step 1 − Create an AD Directory using the following steps.

Go to Amazon WorkSpace service in AWS management console.

Select Directories, then Setup Directory in the navigation panel.

A new page will open. Select Create Simple AD button, then fill the required details.
In VPC section, fill the VPC details and select Next step.

A review page will open to review the information. Make changes if incorrect, then click the Create Simple AD button.


Step 2 − Create a WorkSpace using the following steps.

Go to Amazon WorkSpace service in AWS management console.

Select Workspaces and then Launch WorkSpaces option in the navigation panel.

Select the cloud directory. Enable/disable WorkDocs for all users in this directory, then click the Next Step button.


A new page will open. Fill in the details for the new user and select the Create Users button. Once the user is added to the WorkSpace list, select Next.

Enter the number of bundles needed in the value field of WorkSpaces Bundles page, then select Next.

A review page will open. Now workspace creating process is started, it take's approx 15 minutes.
Step 3 - Connect with WorkSpace

After sometimes it shows your workspace status is Available and as well as user got a confirmation mail.


Follow instructions mentions in mail and setup credentials.


Install Amazon Workspaces Client. (link is given in mail)

Run the application. For the first time, we need to enter the registration code received in email and click Register.

Connect to the WorkSpace by entering the username and password for the user. Select Sign In.


Benefits of Amazon WorkSpaces

Easy to set up − Customers can choose AWS WorkSpaces plans of their choice and provide requirements such as CPU type, memory, storage and applications, and a number of desktops.

Choice of devices and applications − Customers can install Amazon WorkSpace application on their device (Laptops, iPads, Tablets) free of cost and can choose applications from the available list.

Cost-effective − Amazon WorkSpaces require no upfront commitment and the customers pay as they customize their desktop, on a monthly basis.
Read More